How to Win an Airbnb Damage Claim: The Complete Evidence Guide
Every Airbnb host dreads the moment: you walk into your property after a guest checkout and discover damage. A stained sofa, a cracked countertop, a broken appliance. You need to make a claim, but the sinking feeling sets in: will Airbnb actually pay out?
Many Airbnb damage claims are disputed or only partially approved. Not because the damage did not happen, but because hosts cannot prove it to the standard Airbnb requires. This guide shows you exactly what evidence you need, how to collect it, and how to structure your claim for maximum success.
Why Most Airbnb Damage Claims Fail
Claims typically fail for three reasons:
1. Insufficient or Missing Evidence
The single biggest reason claims are denied is that hosts cannot conclusively demonstrate the damage was caused by a specific guest. Saying "it was fine before they arrived" is not enough. You need photographic proof that the item was undamaged immediately before that guest's stay and damaged immediately after their departure.
2. Missed Deadlines
Airbnb's AirCover for Hosts programme requires you to submit your claim within 14 days of guest checkout, or before the next guest checks in, whichever comes first. Many hosts discover damage days later, or prioritise getting the property ready for the next booking and miss the window entirely. Once that next guest checks in without a claim being filed, you have lost your ability to attribute the damage to the previous guest.
3. Poor Claim Presentation
Even when hosts have evidence and meet deadlines, poorly structured claims get rejected. Blurry photos, no context for what the viewer is looking at, missing cost documentation, or claiming inflated amounts all reduce your credibility in the eyes of the case manager reviewing your submission.
What Airbnb's Resolution Centre Actually Requires
To succeed with an Airbnb damage claim, you need to satisfy the platform that:
- The damage exists: Clear photographic or video evidence of the current state of damage.
- It was not pre-existing: Evidence that the item or area was in good condition before the guest's stay (baseline photos).
- It occurred during a specific booking: The damage must be attributable to a particular reservation, meaning your evidence must be time-bounded.
- The cost is reasonable: Receipts, invoices, or quotes for repair or replacement that reflect fair market value.
- The claim is timely: Submitted within the 14-day window and before the next guest arrives.
Under AirCover for Hosts, Airbnb covers up to USD $3 million in damage protection. (Airbnb Help) This is not an insurance policy you simply "activate." It is a discretionary programme, and the burden of proof sits entirely with you as the host.
The Evidence Standard: What "Good Evidence" Looks Like
Successful claims share three characteristics in their evidence packs:
Time-Stamped Photography
Every photo must have verifiable metadata showing when it was taken. Phone camera photos naturally embed EXIF data (date, time, GPS coordinates), which Airbnb's team can verify. Screenshots or photos downloaded from messaging apps often strip this metadata. Always use original files.
Your photos should show:
- The same angle and framing for before and after shots
- Sufficient lighting to clearly see the condition
- Context (include enough of the surroundings to identify the room and location)
- Close-up detail of the specific damage
Before/After Comparison
A single "after" photo of damage is weak evidence. What makes a claim compelling is a side-by-side comparison showing the same item or area in pristine condition before the guest arrived, and damaged condition after they departed. This visual contrast makes it immediately obvious what changed.
The "before" photos should be taken as close to the guest's check-in time as possible, ideally on the same day after cleaning and preparation is complete. This eliminates any argument that the damage could have occurred between your photo and the guest's arrival.
Booking Linkage
Your evidence must clearly establish a timeline: photos taken before Guest X arrives, then photos taken after Guest X departs, with no other guests in between. If you have back-to-back bookings and do not document between each one, you cannot definitively prove which guest caused the damage.
Step-by-Step: How to Document Damage Properly
Phase 1: Before the Guest Arrives (Baseline Documentation)
This is the most critical phase and the one most hosts skip. Without baseline evidence, your claim is built on sand.
What to photograph:
- Every room from multiple angles (wide shot from doorway, then each wall)
- All furniture surfaces (tables, countertops, desks), close enough to show the condition
- Flooring in high-traffic areas and under tables/chairs
- Bathroom fixtures, tiles, and grouting
- Kitchen appliances (oven door, hob surface, fridge shelves)
- Soft furnishings (sofa cushions, mattress condition, curtains)
- Walls and paintwork, especially in narrow corridors
- Outdoor areas if applicable (garden furniture, decking)
- Any items of particular value (artwork, electronics, speciality kitchen equipment)
How to photograph:
- Use your phone's native camera (not a messaging app camera) to preserve EXIF data
- Ensure location services are enabled for GPS embedding
- Take photos in good, natural light where possible
- Use consistent angles (you will need to replicate these after checkout)
- Include a wide contextual shot, then close-ups of surfaces and items
When to photograph: After the cleaner has finished and the property is guest-ready, but before the guest has access (ideally the same day as check-in). The closer to the guest's arrival time, the stronger your evidence.
Phase 2: During the Stay
During the guest's stay, there is limited documentation you can do without being intrusive. However, you should:
- Save all communication with the guest via Airbnb's messaging system. Off-platform messages carry less weight, so never move to WhatsApp or text.
- If the guest reports any issues during their stay, ask them to describe the situation in detail via the Airbnb message thread
- Note any concerns about the booking (large parties, noise complaints from neighbours) in writing, as these can support your narrative later
Phase 3: After Checkout (Damage Discovery)
Your post-checkout inspection should happen as soon as physically possible after the guest departs. Every hour that passes weakens your position.
Immediate steps:
- Do a full walkthrough before cleaning begins. If your cleaner finds damage, have them photograph it immediately and notify you before touching anything.
- Photograph everything. Even areas that look fine. This rules out claims from Airbnb that "other damage existed too."
- Match your baseline angles. Retake photos from the same positions as your pre-stay documentation. This makes comparison trivially easy for the case manager.
- Document the detail. For each item of damage: one wide shot showing location, one medium shot showing the item, and one close-up showing the damage itself.
- Record video if possible. A narrated walkthrough video showing the damage in context is powerful supporting evidence.
Phase 4: Cost Documentation
Once you have photographic evidence, you need to establish the financial impact:
- Original purchase receipts for damaged items (check emails for order confirmations)
- Repair quotes from qualified tradespeople (get at least two for items over GBP 200)
- Replacement costs with links to the same or equivalent items currently for sale
- Professional cleaning invoices if specialist cleaning is needed (e.g., carpet deep cleaning, upholstery stain removal)
Airbnb applies depreciation. A five-year-old sofa that originally cost GBP 1,200 will not be reimbursed at full price. Claim fair current value rather than replacement-as-new; this demonstrates good faith and is more likely to be approved.
Common Mistakes Hosts Make
Mistake 1: No Baseline Photos
By far the most common failure. Without "before" evidence, your claim is your word against the guest's. Airbnb will not side with you on assertion alone, regardless of your hosting track record or Superhost status.
Mistake 2: Cleaning Before Documenting
Many hosts instruct their cleaning team to "just sort it out" so the property is ready for the next guest. Once you have cleaned, repaired, or replaced the damaged item, your evidence is gone. Always document first, clean second.
Mistake 3: Using Edited or Filtered Photos
Any photo that has been edited, cropped, filtered, or manipulated raises red flags. Case managers can detect edited images, and using them undermines your entire submission's credibility. Always submit original, unedited files.
Mistake 4: Claiming for Wear and Tear
Scuff marks on a wall after 200 bookings are normal wear and tear, not guest damage. Claiming for items that have clearly deteriorated over time makes you look like you are trying to profit from the system, and can result in your legitimate damage items being rejected alongside the weak ones.
Mistake 5: Delayed Reporting
Even within the 14-day window, delays work against you. A claim submitted on day 13 looks very different from one submitted within 24 hours. The sooner you report, the more credible your timeline appears.
Mistake 6: Accepting a Low Offer Without Escalating
Airbnb's initial offer is often lower than your claim. You have the right to reject it and provide additional evidence or reasoning. Many hosts accept the first offer out of frustration, not realising they could receive more with a clear, evidence-backed counter.
How to Structure Your Claim Submission
When you submit through the Resolution Centre, presentation matters.
Opening Summary
Start with a brief, factual summary: what was damaged, when you discovered it, and the total amount claimed. Keep it to two or three sentences. Be professional and unemotional.
Timeline
Lay out the key dates clearly:
- Date and time of pre-stay inspection (with photos taken)
- Guest check-in date
- Guest checkout date
- Date and time of post-stay inspection (with photos taken)
- Date damage was reported to Airbnb
Evidence Per Item
For each damaged item, present:
- Description of the item and its location
- "Before" photo with timestamp
- "After" photo with timestamp, from the same angle
- Close-up of the specific damage
- Cost documentation (receipt, quote, or replacement link)
- Amount claimed with depreciation reasoning if applicable
Supporting Context
If relevant, include:
- Guest messages acknowledging the damage or situation
- Cleaner's written statement of what they found
- Neighbour communications about noise or disturbance
- Previous inspection records showing the item's condition over time
Professional Tone
Throughout your submission, maintain a calm, factual tone. Avoid accusatory language about the guest. Focus on the evidence and the facts. Case managers respond to professionalism. Emotional pleas or aggressive demands work against you.
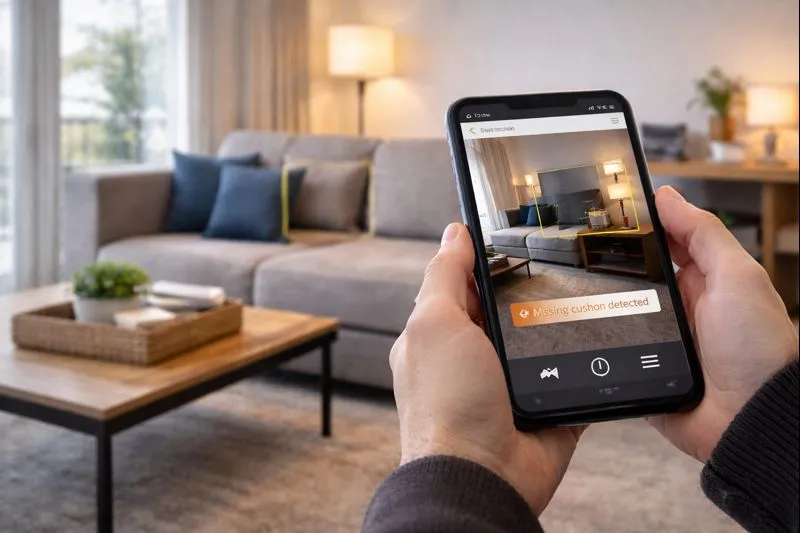
The Role of Technology in Building Evidence Packs
The manual process described above works, but it is time-consuming and error-prone. With back-to-back bookings, tight changeover windows, and multiple properties to manage, even diligent hosts struggle to maintain consistent documentation.
AI-powered inspection tools transform the process from a manual chore into an automated system.
Automated time-stamping and geo-tagging: Modern inspection platforms automatically embed timestamps, GPS coordinates, and property identifiers into every photo captured. This creates an immutable evidence chain that cannot be disputed.
AI-powered damage detection: Rather than relying on a harried cleaner to spot every scuff and stain during a 45-minute turnover, AI can analyse captured images and flag potential damage automatically. This catches issues that human eyes miss under time pressure.
Automatic before/after comparison: When every inspection follows a consistent room-by-room workflow, the system can automatically generate before/after comparisons linked to specific bookings. No more digging through camera rolls trying to find the right baseline photo from three weeks ago.
Booking-linked evidence chains: The most powerful advantage is automatic booking linkage. When your inspection records are tied directly to specific reservations, the evidence chain is unbreakable.
At VeriStay, we have designed our inspection platform specifically around this evidence-chain concept. Every inspection is automatically linked to the relevant booking, every photo is time-stamped and geo-tagged at capture, and AI analyses each image to flag potential changes between check-in and checkout states.
Key Takeaways: Your Damage Claim Checklist
Before Every Guest
- Photograph every room after cleaning, before guest access (same day as check-in)
- Use your phone's native camera with location services enabled
- Capture wide room shots plus close-ups of surfaces, furnishings, and high-risk areas
- Use consistent angles you can replicate after checkout
- Store original files securely (do not rely solely on cloud photo libraries that may compress or strip metadata)
After Every Guest
- Inspect before cleaning begins; instruct cleaners to report damage immediately
- Photograph from the same angles as your baseline
- Document damage with wide, medium, and close-up shots
- Record a video walkthrough for significant damage
- Note the exact time of your inspection
When Filing a Claim
- Submit within 24 hours of discovery (do not wait for the 14-day deadline)
- Always submit before the next guest checks in
- Structure your evidence per item: before photo, after photo, close-up, cost documentation
- Include a clear timeline of dates
- Claim fair depreciated value, not replacement-as-new for older items
- Maintain a professional, factual tone throughout
- Keep all communication on the Airbnb platform
Ongoing Best Practices
- Maintain an inventory list with purchase dates and costs for all furnishings
- Keep receipts for all property purchases digitally organised
- Build a library of baseline photos that updates with each booking cycle
- Review your house rules to ensure damage liability is clearly stated
- Consider a security deposit for high-value properties
- Document wear and tear separately and plan for periodic replacement of high-use items rather than claiming against guests
Final Thoughts
Winning an Airbnb damage claim is not about luck or having the right case manager. It is about preparation, consistency, and evidence quality. The hosts who succeed treat documentation as a non-negotiable part of their turnover process, not an afterthought when something goes wrong.
Ten to fifteen minutes per turnover to properly document your property's condition can save you thousands of pounds when damage inevitably occurs. Whether you do this manually or use an automated inspection platform, build your evidence before you need it.
Ready to modernise your inspections?
VeriStay uses AI to automate damage detection, generate reports, and build evidence packs that stand up to any dispute.
Get Early Access